Showing posts with label $0 Project. Show all posts

Saturday, April 1, 2017

Laundry Room Cuteness on a Budget

I decided to give my laundry room a little love and decorate a bit. I did have a couple things hanging on the walls, and an old wash board sitting out, but other than that it was kinda drab. Everything I did here I used things I already had around the house and spent NO MONEY :)

I have had the basket for a long time it came from a thrift store. I keep clothespins in it & carry out with me to hang clothes on the line. I have lots of old glass jars sitting around so I grabbed this little one & put a few clothespins in it. The letter holder thing I got at a thrift store a long time ago. It was ugly and brown. I finally got around to painting it & love it now. I have had the cake plate & thought it looked sweet with another old jar with flowers stuck in it. I have a stash of fake flowers that I have picked up at thrift stores over the years. The are kind of expensive new so I keep my eye out for cheap ones!!
The basket I got as a Christmas gift. It had pedicure stuff in it so I took it out to use for this. Another old jar with powder stain remover in it. The old jar in the back has liquid detergent in it. I had the little pot but it was shiny & didn't go with my decor so I painted it and added faux moss. The piggy bank was something we had laying around. It was gold so more white paint!!

Here I hung a little scrap fabric garland I made from fabric I already had. The WASH sign was an old sign I wasn't using anymore so I gave it a makeover :)

These zero dollar projects really make my day. I love walking into my laundry room now :)

Have you done any cheap decorating lately?? I would love to hear about it! :)

Linking up at :


Monday, October 1, 2012

Busting at the Seams..a Craft Room

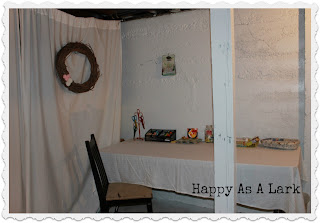
So my craft room is located directly off of my living room and has no doors...can you see where this is going?? Yea..not a pretty sight. I am a spur of the moment, may only have 10 minutes before I have to leave the house, but I'm starting a project kinda girl. This usually results in a craft room that looks like an F5 tornado has just passed through...I think one of the reasons it's so hard to keep clean and organized is because the space is used for too many things. I had ALL my scrapbook stuff crammed in there, ebay shipping supplies, crafts of all kinds, sewing machine & supplies, things that need to be sold, donated, etc..the list could go on, you get the point.
My solution was to create a 2nd space for me & some of my {stuff}. Here is what I came up with, without spending any money and doing almost all the work myself.

I took about half of the stuff from my upstairs craft room & put it in my "new" basement space. **{this is an unfinished basement}
I had this big shelving unit in the basement already, just moved it & filled it up.

I have everything organized & in plain sight :)
This is a view looking the other direction. It's my little guy's playroom. He was so kind to share with his momma ♥
I love this sweet little rusty utility cart my sister found me at a yard sale this summer. I found that pretty lampshade at Lowe's for $3 :)
I am so happy with the way it all came together. My upstairs space is now uncluttered and clean and I have this nice new space to make a mess in!!

Friday, September 21, 2012

Pumpkins

To celebrate the 1st day of Autumn this weekend I am sharing my pumpkins with you. This was a super easy project, inspired by this post at You Craft Me Up blog. It thrills me to no end when I have everything I need to do a project I come across!! We had some 4 x 4 wood post pieces left over from when my husband built our fence. I am so glad we didn't toss them out. They make super cute pumpkins :)


Happy Autumn and have a fabulous weekend.


Sunday, August 26, 2012

Old Shabby Window Project

I am so glad when we got new windows in our house we kept the old ones in the garage. At the time I didn't really do too much painting and redoing of things, but thought I might be able to make something with them..

This is just one of many. All I did was paint this one white, add a 2nd coat of custom mixed turquoise over the top of that (when I say "custom mixed" that is just fancy talk for I poured colors together until they looked pretty) and shabbied it up a bit.


I hung my coffee filter wreath on it for photos :)


Lovin it ♥

Wednesday, May 2, 2012

DIY Shabby Table

My super sweet husband grabbed these for me from the dump.

Table legs, missing the table ;)

He also grabbed this for me out of someone's curbside trash after I begged him repeatedly to go get it.

I mean OBVIOUSLY this thing is not on it's last leg yet!!!

Here is what we turned it into.


Thosw sweet legs now have a table.
He cut all these slats for me out of that dilapitated pile. I painted them & shabbied them up.
I love it {♥}

And here is proof that one man's trash is another man's girl's treasure :)

Monday, March 5, 2012

Coat Closet Makeover

We have a coat closet in our laundry room that has been stuffed FULL of coats and shoes and backpacks since the day we moved in 5 years ago. We never painted it or did anything with the unfinished floor. In fact, it has been so FULL that we couldn't see the walls or the floor anyway...something HAD to be done!!

This weekend I filled laundry baskets with all the contents of the closet and got busy!!

Yes, that is mint green paint.....but it's empty!!

So dirty & grimy. YUCK!!
Unfinished floor with water stains. Eeeewwwww.
AFTER
I removed the old hooks & just freshened them up with a coat of yellow spray paint. Painted the walls, added shelves that my hubby cut to size. Finished it with stick on tiles we had leftover from other projects & baseboard my sweet husband cut & installed for me too :)
And here it is with the kids' coats & backpacks hung up.

They each get 1 shelf for shoes & Shaun & I get the bottom for ours.
So happy with the results!!!!
One last look "before" and "after".

This was a great weekend project. The best part is we did not spend a PENNY. We made use of whatever we had laying around :)

$0 PROJECT

Sunday, March 4, 2012

Gallery Wall

Finally the reveal of the "bigger" project I have been yapping about :)


My 1st gallery wall.

In order for you to truly appreciate it, I think you should see the pile I started with :)
This is a small wall at the top of my stairs that was just bare before. I think I like it!!

That big pile of stuff came out of my craft roon by the way!! You know what that means :) Another $0 project.

Check back this week for my coat closet makeover.

Friday, March 2, 2012

Pink + Turquoise = Love

I don't know about you, but pink & turquoise together are a {perfect} color combination. Add a little red to that & it's even better!!

Here is another small project I came up with that is going to be part of my "bigger" project I have been talking about :)

I took an ugly old frame & painted it pink. Added this sweet piece of fabric (that was actually a little dress to begin with). I cut the yellow "H" out for our last name & used heat & bond to adhere it.
I love this dainty little floral print.

And here it is in it's place :)

Thursday, March 1, 2012

Mini Pennant Banner-$0 Project

This little project is part of a {bigger} project I have in the works.

It started with this unfinished frame I picked up at the thrift store.


And ended up like this!!

I cut 3 triangles out of red felt I had leftover from Valentine's crafts and hot glued it to some jute twine.

The little yellow rosette adds a pop of color :) I used some scrap fabric to make it.

I can't wait to reveal the "bigger" project.

P.S. I have added a catergory called "$0 Projects". Anything tagged with this is a project I have completed without going out to buy anything for it. Everything used is stuff I had on hand.

Wednesday, February 29, 2012

Drab to Fab-$0 Project

I had an old sign that was a great size & shape, but needed a little face lift.

Here it is in this pile of junk. The one that is black and dark and drab. That junk will come to life in another post :)


And here it is AFTER I painted it & prettied it up.

Painted shabby white & painted "Life is beautiful" in sunny yellow. I also added some fabric & felt rosettes to the corner.


 I like it much better now!!

You will have to check back soon to find out how that mess turned out :)

Tuesday, February 28, 2012

Colors of the Rainbow

Trying to finish up my mantel I needed to find (or make) something else to go with my St. Patrick's Day theme. Browsing through Pinterest I saw rainbows so I tried that.

Yes I do realize I am missing one color if I were being true to the real rainbow. But, it has the rainbow effect I was going for!!
All I did for this project was cut some colorful paper & stick it in an old frame I had. I added the photo of my kids in front & sat it on the mantel. Since my t.v. hangs  above my mantel it really limits my decorating :(  This works though!!
That big ole TV really messes up my look!! ;)

We are having some wonderful temperatures around here & I am definitely getting Spring Fever!! I am really looking forward to some more crafts :)

Linking Up:

Sunday, February 26, 2012

Happy Little Bird

I am a follower of Trisha's fabulous blog called The Delectable Home I absolutely fell. in. LOVE. with her spring mantel.
Isn't it wonderful!?!?

I knew as soon as I saw her {little bird art} that I had to have one of my own!! I just happened to have (a slight bird obsession) and a rustic looking frame like her's & I dug through my fabric scraps to find some pretty colors. It was a quick project. I would say it took maybe 20 minutes.

I think I have really gotten my $10 worth out of the fabric I bought to do my camera strap. This is some of it :) I just adore this little bird & the way he is sitting on a real tree branch ♥♥

I used the same template I used to make my love birds. I ironed heat & bond onto the bird cutout, then ironed that onto the yellow fabric. Heck, I even recycled part of the branch I had my hearts hanging on for Valentine's Day.


I did not spend any $$ out of pocket for this darling project!!! My husband did look at me like I was crazy when I started this project out of the blue at 9 o'clock a night, but I am totally used to getting that look from him :)

Thursday, February 23, 2012

Getting out my GREEN

I finally got my Valentine's decor taken down & stuck in a box in the dining room put away :)

Time to get out my GREEN!! Last year I didn't have much, so I really needed to come up with a couple new things to put out for St. Patrick's Day this year.

I had these 3 cute mini pots that I painted black & stuck vinyl numbers on. I had intended on putting some kind of fake plant in each one & have never come across anything that would work. I even looked again at walmart yesterday for something, but came home empty handed.

Digging through my craft closet I found this pretty green moss.

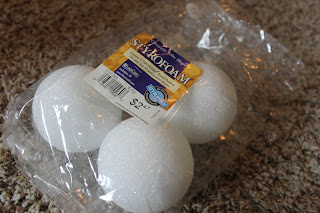
And these wonderful foam balls that I only paid 50 cents for. The price says $2.47 originally :)


Here is how they turned out!!


{I love the green moss}

Love them!! The white feathery thing in the middle is a Christmas ornament I picked up on sale at Hobby Lobby. It doesn't look christmasy to me :)
Check back soon for more GREEN to come!!
Linking Up: